Friday, March 16, 2018

FTU Just my luck


Kit buy Wicked Scraps HERE

Tube Alex Prihodko at PFD HERE

Mask 514 from Loris Psp Graphics HERE

Templet #802 at Millie PSP Madness HERE

C&P means Copy and paste

Open Templet Copy and close original
Now with the copy go to image then to
canvas size and choose 649X649 or what
ever size you want your tag to be.
Close off layer 3, 4

Open paper #5 resize it 82% C&P to templet place
it on top of layer 7, then click on layer 7
select the select all, float, defloat
then invert then hit delete on your keyboard.
then select none.


Then click on layer #1 and use Flood fill with
this color or a color in your tube #225f31
Open your close up tube and C&P it to templet
above layer 2 move it to where you want it,
and then click on layer 2 to select it, then
selections, select all, float, defloat, then
invert then on keyboard click delete then select
none. Then on same layer turn opacity to 71% and
change it to Burn in drop down menu.
C&P your Tube to your templet.


Go to layer 2 select all, float, defloat, modify,
Expand by 3 pixels, then make a new layer, flood
fill it with white or any color you choose. Then
on the new layer go to Adjust, add remove/noise,
75% Gaussian, monochrome checked then ok.

Open Item clover #2  C&P to templet.
Open Item Clover #3 Resize 60% C&P to templet.
Open Item Hat 1# Resize 30% C&P to templet.
Open Item Pot of Gold Resize 70% C&P to templet
I moved it behind the tube and turned the opacity
to 30%.

Click on layer 1, then select all, float, defloat,
modify 3, then ok then make a new layer and put it
below layer 1 and flood fill it with white then select
none.


OK open paper #1 and C&P it move it to the bottom of all
your layers. Then go to layers, new mask layer, from image,
then in pull down menu look for your mask, settings below
click ok.


I added a drop shadow to all layers and tubes. Then added my
license and my name the font I used was BankGothic RUSS

and we are done :)

Friday, September 29, 2017

FTU Fright nite


Templet by Lori  HERE

Kit by Nae HERE

Tube Very Many HERE

PLUG in -Alien Skin Impact,

Open templet duplicate it and close original
resize it 92%.

Open tube and copy and paste it to templet.

Add the close up and move it behind on the templet
and erase all that is sticking out.

Open Element 6  copy and paste to templet.

Open Element Pumpkin1 Resize 64% copy and paste to templet.

Open Element stone  Resize 80% copy and paste to templet.

Open Element moon2 Resize 32% copy and paste to templet.

Open Element bat2 Resize 54% copy and paste to templet.

Open paper 12 and resize it 81% and then go to your templet and
select your #3 layer and select all, float, defloat then go to
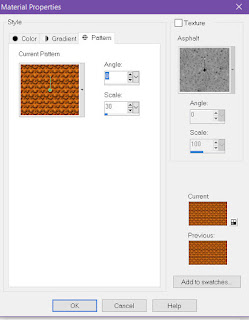
your materials pallet it opens and you will see 3 tabs choose Pattern
I choose 0 angle and 30 on scale then I flood filled the selected area
on the templet.

Then minimize the paper. Ok now back to templet
on layer 3 selected go to Effects, Texture Effects, the Fur use settings
below.

Now I go to layer 16 select it then flood fill like we did above
with the paper Texture then I used the Fur settings like above.
I then moved that layer below the #13 layer.


Click on the 18 layer then go to Alien Skin Impact, Chrome see below
for settings. I did the same for layer 13.


Then on layer 17 I used
the same Chrome but changed the setting to Metal liquid.


Open Element weed 2 Resize 62% copy and paste to templet.

Open Element broom Resize 31% copy and paste to templet.

I then moved layer 10 ahead of layer 12 and 11. Then I picked out
a gradient of 2 colors of Orange and Yellow and flood filled
layer 10.

Then I went to my close up and turned its opacity to hard light 51%.

Then I went to layer 13 and added some noise 39%

Add drop shadow to elements.

I then added a mask, my name and copywrite would love to see
what you made.

Monday, September 25, 2017

FTU Autumn Surrender


Kit Sweet Autumn- HERE
Tube Alex Prihodko HERE
plugin Mura Copies

Open a new page 649x649 Vector background.

Open element Autumn (12) frame copy and paste it to new page.

open element Autumn (56) resize 73% Copy and paste in new tag.

open element Autumn (59) resize 53% copy and paste in new tag.
Go to plug in Muras Copies and choose encircle with settings
below, then I move it in back of the frame and use the eraser
tool to erase all thats showing in the middle of frame after I
duplicated the leaves and then rotated the top one.

open element Autumn (15) copy and paste in new tag.

open element Autumn (54) copy and paste in new tag.

open element Autumn (8) resize 50% copy and paste in new tag.

open element Autumn (65)  copy and paste in new tag.

I then added my tube full size and positioned it behind the frame
and then I free rotated it and put move it where you like it.

Then I used an eraser tool to erase the part of the tube thats
on the outside of frame. I then turned the tube to Hard Light 42%
I then went back to my original tube copy and paste it again posted
as a new layer and then resized it by 42%

I opened the Paper folder of kit and used I think paper 2
and picked a Mask that would fit behind it.

I then added drop shadow to all elements and then added copywrite
and my name and we are done. Would love to see what you make.


HERE is another tag I made same tut

Sunday, March 13, 2016

FTU Shamrock Rock


Shamrock Dreams by Golden HERE

Templet by Dee at Dees deessign Depot  HERE

Vix Mask #1 Here

Alehandra Vanhek at SnCo HERE

Lets Start
Open Tube and Mask Minimize

Close off brown stripes and dotted Square.


Open Templet, Duplicate and close original,
Resize Templet 88% then Canvas size 643x643 Close off BG white layer

Open Element SD-4 Resize 53% copy and paste to tag.

Open Element SD-Beads 1 copy and paste to tag.

Open Element Sd-Barrel 1 Resize 53% copy and paste to tag
move undewr the beads

Open Element SD-coins1 Resize 53% copy and paste to tag.

Open Element SD-hat deco1 Resize 74% copy and paste to tag.

Open Element SD potofgold1 Resize 61% copy and paste to tag.

Open Element SD-Shamrock Scatter1 Resize 61% copy and paste to tag
duplicate then move each behind layer Yellow Square.

Open Element SD-sparkle2 Resize 46% copy and paste to tag.

Open Element SD Scatter1 Resize 80% copy and paste to tag.

Open Element 4 Resize 64% copy and paste to tag.

Open Element beer1 Resize 34% copy and paste to tag.

Open Element horn Resize 49% copy and paste to tag.

Open Element coin 1 copy and paste to tag.

Open Element scatter3 Resize 71% copy and paste to tag.

Open Element shamrock swirl1 Resize 80% copy and paste to tag.

Open Element coins2 Resize 91% copy and paste to tag.

Flood fill layer yellow Circle with this color
#458c00 Then on same layer select all, float,
defloat, modify by 3 then make a new layer and flood
fill it with #fed22d and then move it below the yellow
circle layer and then select none, and add 100 % noise.

Open paper SD-Paper3  Resize 81% copy and paste to tag move
it above gold oval, then click on gold oval layer, then
select all, float, defloat, then invert then go to layer
Paper 3 then hit delete on your computer key board, then
select none.

Now make a gradient with these 2 colors
#fed22d #458c00 then made a new layer and moved it
to the bottom and flood filled this new layer then
I went to layers, new mask layer, from image, then in
pull down area find the Vix0001 mask and use it.

On the brown square layer select all, float,
defloat, modify by 3 then make a new layer and flood
fill it with white and then move it below the brown
square layer and then select none, and add 100 % noise.

I flood filled the Yellow oval with this color #59af00

ok on the large Clover layer I selected all, float, defloat,
modify by 3 then made a new layer and moved it below the clover
then flood filled it with the gradient we made above and added
100% noise then select none.

I did the exact same thing for the brown oval selected all,
float, defloat,modify by 3 then made a new layer and moved
it below the brown oval, then flood filled it with the
gradient we made above and added 100% noise then select none.

I added my close up to the yellow square and the yellow oval layer.
Then added my full size tube behind the money , barrel, ect
and then errased what was life under tag.


Then i went back and added a drop shadow to them all.

And added my name and copywrite ect... we are done!!

Monday, February 29, 2016

FTU- Shades of Shamrock


Kit by Tashas Playground HERE

Templet by Magik 0039 HERE

Mask by Vix HERE


Ok lets Start

Open Templet, Mask, and your tube
minimize tube and Mask
Duplicate Templet close original resize 77%
then Canvas size 648X648


Close off Credit layer and Center Rec. 

Open paper 4 and resize 75% copy and paste above
layer center Circle 1 then click on this layer
select all, float, defloat, invert then click
on the paper layer then hit delete on your
keyboard, then select none.

Open paper 1 and resize 75% copy and paste above
layer center Rec 2 then click on this layer
select all, float, defloat, invert then click
on the paper layer then hit delete on your
keyboard, then select none.

OK now I made a gradient with these 2 colors
#204a0a, #87be59 see settings below

Then I flood filled Center Rec 1, with the gradient.


Then I flood filled R Circle and L Circle with this color
#87be59

Then I flood filled Center Circle Back with this color
#56e010

Then I flood filled bottom R Circle, and top L Circle with this
color #56e010

Ok now on the L Circle and R Circle on one at a time I selected all float, defloat, modify by 3 then clicked to make a new layer, and flood filled it with green and then selected none and on each green layer I added 100 %  noise.

Ok now on the center Circle 1  I selected all float, defloat, modify by 3 then clicked to make a new layer, flood filled it with white and then selected none.

Ok now on the center Center Circle 2  I selected all float, defloat, modify by 3 then clicked to make a new layer, flood filled it with #ffce47 and then selected none.

Now on the center Bottom L Circle, and bottom R Circle
I selected all float, defloat, modify by 3 then clicked
to make a new layer, flood filled it with #ffce47 and
then selected none.

Now on the Center Rec 2 I selected all, float, defloat,
modify by 3 then clicked to make a new layer,
flood filled it with white and then selected none.

Ok on the dotted circle go to adjust, then Brightness/contrast with
the settings below.

this will make it white if you need to have it dark
then on the settings move the slidders the other direction. I did the same
settings making them white for top L dotted rec, bottom R dotted square, and L dotted Circle, and R dotted Circle.

Then Center Circle 2 I flood filled it with #2b830f

Open Element flower1 copy and paste to tag.

Open Element bow 1 Resize 65% copy and paste to tag.

Open Element charm copy and paste to tag.

Open Element deco1 copy and paste to tag duplicate
then mirror.

Open Element grass copy and paste to tag.

Open Element shamrock2 copy and paste to tag.

Open Element flower3  copy and paste to tag.

Open Element scatter copy and paste to tag then
change its color by clicking Adjust, Hue and Saturation
then color then use settings below

Then duplicate
place one on bottom and one on top. 


Open Element rings copy and paste to tag move it below
your scatter.

Open Element rainbow  copy and paste to tag duplicate
then move it below the other.

Now I made a gradient with #204a0a, #87be59
See the settings above for the Gradient.
Then I made a new layer and filled with this gradient
and moved it to the bottom layer.....
Then Click on Layers New Mask Layer, From Image,
Then in pull down area choose Vix-STpats2013 then
on ok then on layers pallet merge group.

Now add your tube on the outside ones I
turned opacity to Screen, and then close up
in the middle I turned it to 65%
and then add your full size tube
then copywrite and your name and your done!! 


Wednesday, February 17, 2016

FTU Lucky Lady


FTU kit by Vaybs -Lady luck HERE

Pinuptoons March Tube at CDO HERE

Simple Expressions 7 Templet
HERE

Weescotslass Mask WSL_Mask99  HERE

Eye Candy Gradient Glow

Lets Start

Open tube and Mask minimize

Open paper 4 Resize 90% copy and paste to tag move
it above shape 2, then click this layer and then
select all, float, defloat, then invert then go to layer
Paper 4 then hit delete on your computer key board, then
select none.

Open paper 11 Resize 90% copy and paste to tag move
it above shape 3, then click this layer and then
select all, float, defloat, then invert then go to layer
Paper 11 then hit delete on your computer key board, then
select none.

Open paper 2 Resize 90% copy and paste to tag move
it above shape 3, then click this layer and then
select all, float, defloat, then invert then go to layer
Paper 2 then hit delete on your computer key board, then
select none.

Ok now I made a gradient with these 2 colors
#529d0e and #e6dd90 and settings are below for
this then I flood filled layer shape 1, then
I went back to gradient and changed the repeats
to 12 and flood  filled med Frame, Small frame
and large frame with gradient.


Then I changed the gradient to the solid color
#f7ba44 and flood filled Large Frame Trim, Small
frame trim, and medium frame trim, and image then I added
noise to each one of 43%
Now I changed the color to #67a620 and flood filled all
of the Frame Fill layers.

Open Element 55 Resize 59% copy and paste to tag.

Open Element 8 Resize 59% copy and paste to tag.

Open Element 32 Resize 59% copy and paste to tag.

Open Element 48 Resize 59% copy and paste to tag.

Open Element 41 Resize 59% copy and paste to tag.

Open Element 54 Resize 47% copy and paste to tag.

Open Element 39 Resize 59% copy and paste to tag.

Open Element 45 Resize 59% copy and paste to tag.

Open Element 42 Resize 59% copy and paste to tag
duplicate 2 times and then flip these and mirror one.

I then went and added a gradient glow to all the frames
with Eye Candy below is settings then I moved the Frame
all the frame trim above on the layers.
Details are below for settings.


While I was on each of the frame trim I selected all
float, defloat, then modify by 2, then made a new layer
and moved it under frame trim and flood filled layer with
white then selected none. I did this on all 3 trims.

Then I went to shape 4 and selected all, Float, Defloat
modify by 3, then made a new layer moved it below the
shape 4 layer and flood filled it with this color #5ba116

Then I went to shape 3 and selected all, Float, Defloat
modify by 4, then made a new layer moved it below the
layer shape 3 and flood filled it with this color
#f7a410 I then added noise 43%

Then I went to shape 1 and selected all, Float, Defloat
modify by 4, then made a new layer moved it below the
layer shape 1 and flood filled it with this color
#f7a410 I then added noise 43%

Ok now go to Image Canvas size 625X625.

I now made a gradient the same as above and flood filled
the white bg then I used WSL-mask99
by new mask, from image, then in pull down area choose
WSL_mask99 then on ok.

ok now add your tube and your name and Copywrite and your done!

Tuesday, February 16, 2016

FTU Shamrock Dreams 3 Piece set


Sassy Dee dees Colab Shamrock Dreams HERE

Templet Set by Sly HERE

Weescotslass WSL_Mask218  HERE

LETS start..............
Open Templets and on the main tag templet duplicate, and close
original then resize 80% then canvas size 649X649


Duplicate Avi and the other set templet and close original.


Then minimize other 2 templets.

Close off all text and info.

Open your mask and Tube and minimize.

Open paper 5 Resize 78% copy and paste to tag move it
above blue rectangle then click on layer blue rectangle
then select all, float, defloat then in invert then
click on your blue rec. layer then hit Delete on your
key board then select none. 

Open paper 7 Resize 78% copy and paste to tag move it
above blue square then click on layer blue square
then select all, float, defloat then in invert then
click on your blue rec. layer then hit Delete on your
key board then select none. 

Open paper 3 Resize 68% copy and paste to tag move it
above small green square left and again on top of small green
 square right, then click on the left one
then select all, float, defloat then in invert then
click on your blue rec. layer then hit Delete on your
key board then select none now do the same  with the Right
side.

Open paper 19 Resize 78% copy and paste to tag move it
above large red square then click on layer blue square
then select all, float, defloat then in invert then
click on your blue rec. layer then hit Delete on your
key board then select none.

Open paper 5 Resize 78% copy and paste to tag move it
above large red square then click on layer blue square
then select all, float, defloat then in invert then
click on your blue rec. layer then hit Delete on your
key board then select none then I turned the opacity down
to 51% so you have 2 papers on this layer.

Flood Fill red Square with this color #5ea422

Open Element 47 Resize 56% copy and paste to tag.

Open Element 55 Resize 45% copy and paste to tag.

Open Element 51 Resize 45% copy and paste to tag
duplicate then mirror.

Open Element 49 copy and paste to tag then free rotate
left.

Open Element 123 copy and paste to tag.

Open Element 86  Resize 70% copy and paste to tag.

Open Element 25 Resize 70% copy and paste to tag.

Open Element 83 Resize 29% copy and paste to tag.

Open Element 23 Resize 27% copy and paste to tag.

Open Element 17 Resize 27% copy and paste to tag.
Make a new layer, and then make a gradient with
these 2 colors #5ea422 and #fad042

and then move layer to bottom of tag then flood
fill with layer with the gradient you made. Below
is the settings I used.


I then went to Layers
and choose New Mask Layer, From image then in
pull down area choose WSL_Mask218 and then on ok then
I merged group.

Then I went back to layers Small Green Square Right and
left, and Large Red Square and on each one at a time
 selected all, float, defloat, then modify by 2 then flood
fill with one of the accent colors of white, green, or the
yellow on each one I added 100% noise to them.

I added a drop shadow to elements and then
added my tube and close up then added my
name and copywrite and license and were done with tag.


Now on to the forum set templet

Open paper 5 resize 81% copy and paste to tag then
click on layer blue Rectangle select all float,
defloat then invert then click delete on your
key board and then select none.

Open paper 3 resize 81% copy and paste to tag then
duplicate move each one on top of green rectangle top,
green rectangle bottom then on each one select all, float,
defloat then invert then click delete on your
key board and then select none.

Ok now click on the red rectangle layer and flood fill it with
the gradient we used for the mask we used on the main tag.
Open Element 51 Resize 35% copy and paste to tag.

Open Element 49 copy and paste to tag then free rotate
left 90degrees.

Open Element 47 Resize 40% copy and paste to tag.

Then I went back to layers Green rectangle top and Bottom and
and on each one at a time selected all, float, defloat,
then modify by 3 then flood fill with one of the
accent colors of white, green, or the yellow on each one
I added 100% noise to them.

Then I added the tube to the red Square with this color
#4a9507 and then copied and pasted the tube and then
selected all, float defloat then invert then hit delete
on the keyboard.

I then added copywrite and name.

on the AVI I flood filled it with this color #4a9507
then added the tube and copywrite and my initial and
we are now done.